Data-driven testing with fbp-spec

Automated testing is a key part of software development toolkit and practice. fbp-spec is a testing framework especially designed for Flow-based Programming(FBP)/dataflow programming, which can be used with any FBP runtime.

For imperative or object-oriented code good frameworks are commonly available. For JavaScript, using for example Mocha with Chai assertions is pretty nice. These existing tools can be used with FBP also, as the runtime is implemented in a standard programming language. In fact we have used JavaScript (or CoffeeScript) with Mocha+Chai extensively to test NoFlo components and graphs. However the experience is less nice than it could be:

  • A high degree of amount of setup code is needed to test FBP components
  • Mental gymnastics when developing in FBP/dataflow, but testing with imperative code
  • The most critical aspects like inputs and expectations can drown in setup code
  • No integration with FBP tooling like the Flowhub visual programming IDE

A simple FBP specification

In FBP, code exists as a set of black-box components. Each component defines a set of inports which it receives data on, and a set of outports where data is emitted. Internal state, if any, should be observable through the data sent on outports.

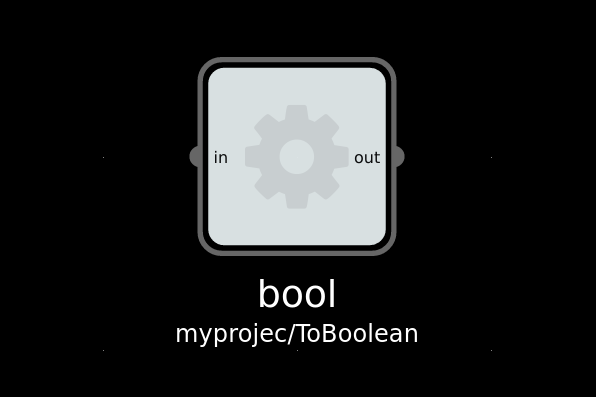
A trivial FBP component

So the behavior of a component is defined by how data sent to input ports causes data to be emitted on output ports.
An fbp-spec is a set of testcases: Examples of input data along with the corresponding output data that is expected. It is stored as a machine-readable datastructure. To also make it nice to read/write also for humans, YAML is used as the preferred format.

topic: myproject/ToBoolean
cases:
-
  name: 'sending a boolean'
  assertion: 'should repeat the same'
  inputs:
    in: true
  expect:
    out:
      equals: true
- 
  name: 'sending a string'
  assertion: 'should convert to boolean'
  inputs: { in: 'true' }
  expect: { out: { equals: true } }

This kind of data-driven declaration of test-cases has the advantage that it is easy to see which things are covered – and which things are not. What about numbers? What about falsy cases? What about less obvious situations like passing { x: 3.0, y: 5.0 }?
And it would be similarly easy to add these cases in. Since unit-testing is example-based, it is critical to cover a diverse set of examples if one is to hope to catch the majority of bugs.

equals here is an assertion function. A limited set of functions are supported, including above/below, contains, and so on. And if the data output is a compound object, and possibly not all parts of the data are relevant to check, one can use a JSONPath to extract the relevant bits to run the assertion function against. There can also be multiple assertions against a single output.

topic: myproject/Parse
cases:
-
  name: 'sending a boolean'
  assertion: 'should repeat the same'
  inputs:
    in: '{ "json": { "number": 4.0, "boolean": true } }'
  expect:
    out:
    - { path: $.json.number,  equals: 4.0 }
    - { path: $.json.boolean, type: boolean }

Stateful components

A FBP component should, when possible, be state-free and not care about message ordering. However it is completely legal, and often useful to have stateful components. To test such a component one can specify a sequence of multiple input packets, and a corresponding expected output sequence.

topic: myproject/Toggle
cases:
-
  name: 'sending two packets'
  assertion: 'should first go high, then low'
  inputs:
  - { in: 0 }
  - { in: 0 }
  expect:
  -
    out: { equals: true }
    inverted: { equals: false }
  -
    out: { equals: false }
    inverted: { equals: true }

This still assumes that the component sends one set of packet out per input packet in. And that we can express our verification with the limited set of assertion operators. What if we need to test more complex message sending patterns, like a component which drops every second packet (like a decimation filter)? Or what if we’d like to verify the side-effects of a component?

Fixtures using FBP graphs

The format of fbp-spec is deliberately simple, designed to support the most common axes-of-freedom in tests as declarative data. For complex assertions, complex input data generation, or component setup, one should use a FBP graph as a fixture.

For instance if we wanted to test an image processing operation, we may have reference out and input files stored on disk. We can read these files with a set of components. And another component can calculate the similarity between the processed out, as a number that we can assert against in our testcases. The fixture graph could look like this:

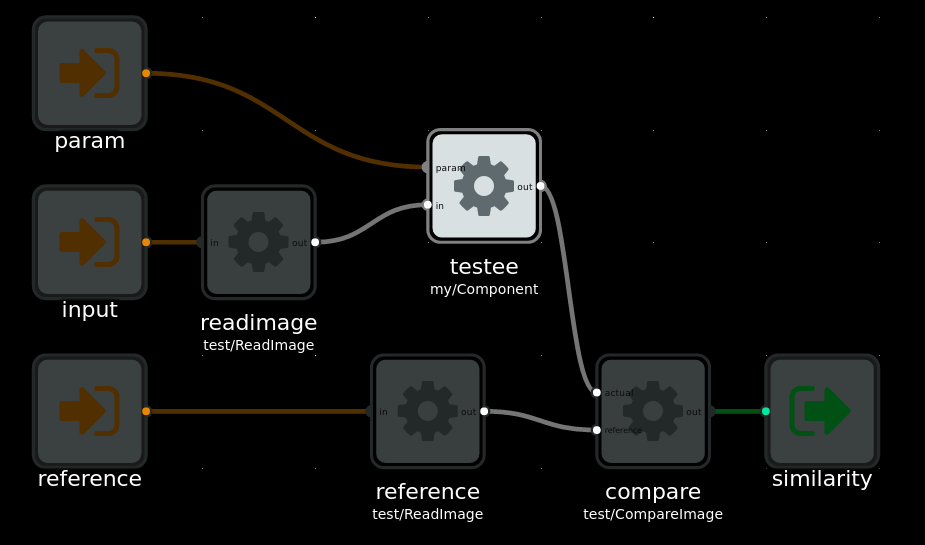
Example fixture for testing image processing operation, as a FBP graph.

This can be stored using the .FBP DSL into the fbp-spec YAML file:

topic: my/Component
fixture:
 type: 'fbp'
 data: |
  INPORT=readimage.IN:INPUT
  INPORT=testee.PARAM:PARAM
  INPORT=reference.IN:REFERENCE
  OUTPORT=compare.OUT:SIMILARITY

  readimage(test/ReatImage) OUT -> IN testee(my/Component)
  testee OUT -> ACTUAL compare(test/CompareImage)
  reference(test/ReadImage) OUT -> REFERENCE compare
cases:
-
  name: 'testing complex data with custom components fixture'
  assertion: 'should pass'
  inputs:
    input: someimage
    param: 100
    reference: someimage-100-result
  expect:
    similarity:
      above: 0.99

Since FBP is a general purpose programming system, you can do arbitrarily complex things in such a fixture graph.

Flowhub integration

The Flowhub IDE is a client-side browser application. For it to actually cause changes in a live program, it communicate using the FBP runtime protocol to the FBP runtime, typically over WebSocket. This standardized protocol is what makes it possible to program such diverse targets, from webservers in Node.js, to image processing in C, sound processing with SuperCollider, bare-metal microcontrollers and distributed systems. And since fbp-spec uses the same protocol to drive tests, we can edit & run tests directly from Flowhub.

This gives Flowhub a basic level of integrated testing support. This is useful right now, and unlocks a number of future features.

On-device testing with MicroFlo

When programming microcontrollers, automated testing is still not as widely used as in web programming, at least outside very advanced or safety-critical industries. I believe this is largely because the tooling is far from as good. Which is why I’m pretty excited about fbp-spec for MicroFlo, since it makes it exactly as easy to write tests that run on microcontrollers as for any other FBP runtime.

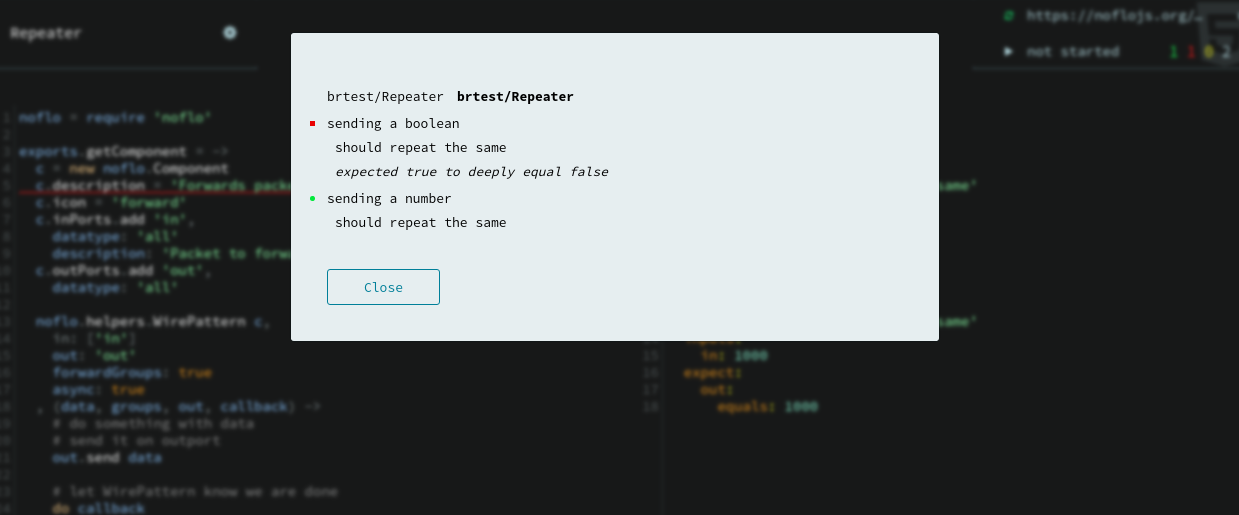
Testing microcontroller code using fbp-spec

To summarize, with fbp-spec 0.2 there is an easy way to test FBP components, for any runtime which supports the FBP runtime protocol (and thus anything Flowhub supports). Check the documentation for how to get started.

MicroFlo 0.3 & Flowhub Beta

Its been nearly 6 months since the previous release of MicroFlo, which was the first that allowed you to visually program your Arduino using NoFlo UI. While we are still just getting started, lots of things have changed since then.

Flowhub

Flowhub is the name of the officially supported, packaged and hosted version of the open source NoFlo UI. This is the IDE used for programming with MicroFlo, and a lot of work has been put into it the last couple of months. Today we released the beta version.

You can test it out for browser, node.js and microcontrollers now.

Other runtimes are in development, and you can add your own by implementing the FBP runtime protocol. For instance there are runtimes for desktop development for GNOME, image processing using GEGL, audio synthesis using SuperCollider and for Python.

Heterogenous FBP

Lightbulb idea: two microcontrollers programmed with MicroFlo used as components in a NoFlo program

Often microcontrollers act as sensors and actuators in a larger system, where embedded computers, mobile devices and servers are used to provide the data storage and processing as well as user interfaces and connectivity with other systems.

With MicroFlo 0.3 one can visually create a microcontroller program, and then export ports on this program to make the entire microcontroller available as a component in NoFlo on node.js. This allows to seamlessly create programs which combine microcontrollers and embedded computers.
We made use of this functionality when we created an interactive table that shows the status of the Ingress virtual reality game.

Platform support

Lunchbox electronics: Some boards that can run MicroFlo

MicroFlo has worked on AVR-based Arduinos from day 1, but it was always the goal to not be specific to Arduino. Therefore I’m happy to say that there are now basic platform implementations for:

  • AVR-based Arduino and derivatives
  • Atmel AVR8 (without using Arduino)
  • mbed LPC1768 (ARM Cortex M3)
  • Texas Instruments Tiva-C (ARM Cortex M4)
  • Embedded Linux (RPi, BeagleBone Black)

Basic bring-up up of new platform can be done in a couple of days, and components which do not use platform-dependent libraries can be used immediately. The goal is to be portable enough that you can pick up whatever capable device you find in your parts-bin, prototype your initial code there – then move the program over to a more ideal device if/when appropriate.
If you have particular platforms you’d like to see supported, leave a note.

Simulation & Automated testing

Automated testing in the embedded world using C/C++ is very painful compared to that of recent web technologies. CoffeScript (or JavaScript) in combination with a modern BDD framework like Mocha makes for simple and beautiful tests.

These tests are ran in a simulator which implements the MicroFlo I/O backend (C++) in JavaScript using a Node.js addon. Unfortunately there are not many good open source instruction-level simulators for the platforms MicroFlo support, so the platform backends can only be tested once we support on-device testing.

Automated testing is a critical piece to making sure that MicroFlo is not only a fun and rewarding way to create microcontroller programs, but also an excellent way to make industrial quality devices.

Easier to get started

A Chrome app is slightly less intimidating for users than a terminal

MicroFlo now ships a Chrome app, used to let Flowhub communicate with the MicroFlo runtime running on device over serial/USB/Bluetooth. This means  it is no longer neccesary to run node.js in a terminal, removing a usability issue in getting started.

In the future, this functionality will be baked into the Flowhub Chrome app itself. With time component code editing, building the firmware and flashing the device will also be available there, making Flowhub a true integrated development environment for MicroFlo.


MicroFlo 0.2.0, visual Arduino programming

Two months after MicroFlo 0.1.0, another important milestone has been reached. This release brings a basic visual programming environment and initial support for all major desktop platforms (Win/OSX/Linux). The project is still very much experimental, but it is now starting to demonstrate potential advantages over traditional Arduino programming.

Official release notes and announcement here.

The start of something visual

The “Hello World” adopted from Arduino, a program that blinks the built-in LED a couple of times per second. Pressing Play (>) uploads the program to the Arduino using MicroFlo.

The IDE shown is NoFlo UI, a visual programming environment which can also be used to program JavaScript for the browser and Node.js using the NoFlo runtime. This project is developed by Henri Bergius and rest of the NoFlo team. For more details about the NoFlo IDE project, check their latest update and follow their Kickstarter project.

Talk

At Piksel 2013 in Bergen, I also presented MicroFlo for the first time, to an audience of mostly new media and experimental sound artists. The talk goes into detail about the motivations behind the project, from the quite practical to the more philosophical considerations. Not my most coherent talk, but it gives some insight.

Link

Next

For the next milestone, MicroFlo 0.3, several things are already planned. Focus is mostly on practical improvements to the system, but I also hope to complete prototype support for “heterogeneous FBP”: Allowing to program systems consisting of both host computer and microcontroller programs in a unified manner using NoFlo+MicroFlo.

I am also planning a MicroFlo workshop at Bitraf some time in December and to demo the project at Maker Faire Oslo.

In the meantime, you can get started with MicroFlo for Arduino by following this tutorial. Feedback and contributions welcomed!

MicroFlo 0.1.0, and an Arduino powered fridge

Lately I’ve been playing with microcontrollers again; Atmel AVRs with and without Arduino boards. I’ve make a couple of tiny projects myself, helped an artist friend do interactive works and helped to integrated a microcontroller it in an embedded product at work. With Arduino, one does not have to worry about interrupts, registers and custom hardware programmers to get things done using a microcontroller. This has opened the door for many more people that pre-Arduino. But the Arduino language is just a collection of C++ classes and functions, users are still left with telling the microcontroller how to do things; “first do this, then this, then this…”.

I think always having to work on such a a low level limits what people make with Arduino, both in who’s able to use it and what current users are able to achive. So, I created a new experimental project: MicroFlo. It has a couple of goals, the two first being the most important:

People should not need to understand text-based, C style programming to be able to program microcontrollers. But those that do know it should be able to use that knowledge, and be able to mix-and-match it with higher-level paradims within a single program.

It should be possible to verify correctness of a microcontroller program in an automated way, and ideally in a hardware-independent manner.

Inspired by NoFlo, and designed for integration with it, MicroFlo implements Flow-based programming (FBP). In FBP, a program is constructed by connecting a set of independent components. Each component has in-ports and out-ports, and can only communicate with eachother through these. The connections can be defined using programatically, using a declarative text language,  or using a visual editor. 2D/3D artists will recognise this the concept from node compositors like in Blender, sound artists from applications like Reaktor.

Current status: A fridge

I have an old used fridge, by the looks of it made in the GDR some time before I was born. Not long after I got it, the thermostat broke and the cooler would not turn off. Instead of throwing it away and getting a new one, which would be the cool and practical* thing to do, I decided to fix it. Using an Arduino and MicroFlo.
* especially considering that it is several months since it broke…

A fridge is a simple system, something that should be simple for hobbyists to create. So it was a decent first usecase to test the framework on. Principially, such a system looks something like this:


The thermostat decides whether to turn the cooler on or off, and the cooler switch realizes this decision. There are many alternative methods of implemening each of these two components. I used a DS1820 digital thermometer IC to read temperature, and a hacked NEXA remote controlled relay for the switch.
All the logic, including temperature threshold is done in software on an Arduino Uno.

The code below for the cooler switch would have been simpler (a oneliner, left as excersise for the reader) if I instead had used a active high relay directly on the mains (illegal if not a certified electrician). Or alternatively reverse-engineered the 433Mhz protocol used.


MicroFlo code for the fridge, in the .FBP domain specific language (examples/fridge.fbp)
# Thermostat
timer(Timer) OUT -> TRIGGER thermometer(ReadDallasTemperature)
thermometer() OUT -> IN hysteresis(HysteresisLatch)

# On/Off switch
hysteresis() OUT -> IN switch(BreakBeforeMake)
switch() OUT1 -> IN ia(InvertBoolean) OUT -> IN turnOn(DigitalWrite)
switch() OUT2 -> IN ic(InvertBoolean) OUT -> IN turnOff(DigitalWrite)
# Feedback cycle to switch required for syncronizing break-before-make logic
turnOn() OUT -> IN ib(InvertBoolean) OUT -> MONITOR1 switch()
turnOff() OUT -> IN id(InvertBoolean) OUT -> MONITOR2 switch()

# Config
‘5000’ -> INTERVAL timer() # milliseconds
‘2’ -> LOWTHRESHOLD hysteresis() # Celcius
‘5’ -> HIGHTHRESHOLD hysteresis() # Celcius
‘[“0x28”, “0xAF”, “0x1C”, “0xB2”, “0x04”, “0x00”, “0x00”, “0x33”]’ -> ADDRESS thermometer()
board(ArduinoUno) PIN9 -> PIN thermometer()
board() PIN12 -> PIN turnOff()
board() PIN11 -> PIN turnOn()

Is the above solution nicer than using the Arduino IDE and writing in C++? At the moment maybe not significantly so. But it does prove that this kind of high-level dynamic programming model is feasible to implement also on devices with 2kB RAM and 32kB program memory. And it is a starting point for more interesting exploration.

Next steps

I will continue to experiment with using MicroFlo for new projects, to develop more components and test/validate the architecture and programming model. I also need to read through all of the canonical book on FBP by J. Paul Morrison.

Some bigger things that I want to add include:

  • Ability to introspect the graph running on the device, in particular the packets moving between components.
  • Automated testing (of the framework, individual components and application graphs)  using  JavaScript BDD test frameworks like Mocha or Vows.
  • Ability to change graphs at runtime,  and then persist it to EEPROM so it will be loaded on next reset.

And eventually: Allowing to manipulate and monitor running graphs visually, using the NoFlo development environment. See bug #1.

Curious still? Check out the code, and ask on the FBP mailing list if you have any questions!