5 years of emlearn

Back in 2018, during my master in Data Science, I started the emlearn project – implementing classic Machine Learning models designed to run on microcontrollers and embedded devices (aka “TinyML”).
Back then, the primary purpose was to learn the ins and outs of these algorithms, to make sure I really understood them well. Thinking about how the algorithms can be implemented efficiently in terms of RAM usage, storage space and CPU time is excellent for that purpose. But I always made sure to keep the code at production-quality, with a decent set of automated tests.

emlearn in use

Fast-forward 5 years, and emlearn has actually been used in a wide range of real-world projects, which is fantastic. Due to the open-source nature, everyone can just download it and use it for whatever they want – so there are probably many uses we will never hear about. And that is fine 🙂 But, there are some uses that I do know of. So here is a small selection of some of the projects using emlearn.

These projects highlight some of the typical characteristics for projects where emlearn is a good fit. Sensor data is analyzed on-device using a combination of Digital Signal Processing and Machine Learning. The extracted information is a low rate data-stream which can then be transmitted wirelessly. All of this can be done on low-cost hardware using general-purpose microcontrollers. Many tasks can also be done at low-power and run on battery.

Locating faults in the electrical power grid

Paper: Micro Random Forest: A Local, High-Speed Implementation of a Machine-Learning Fault Location Method for Distribution Power Systems

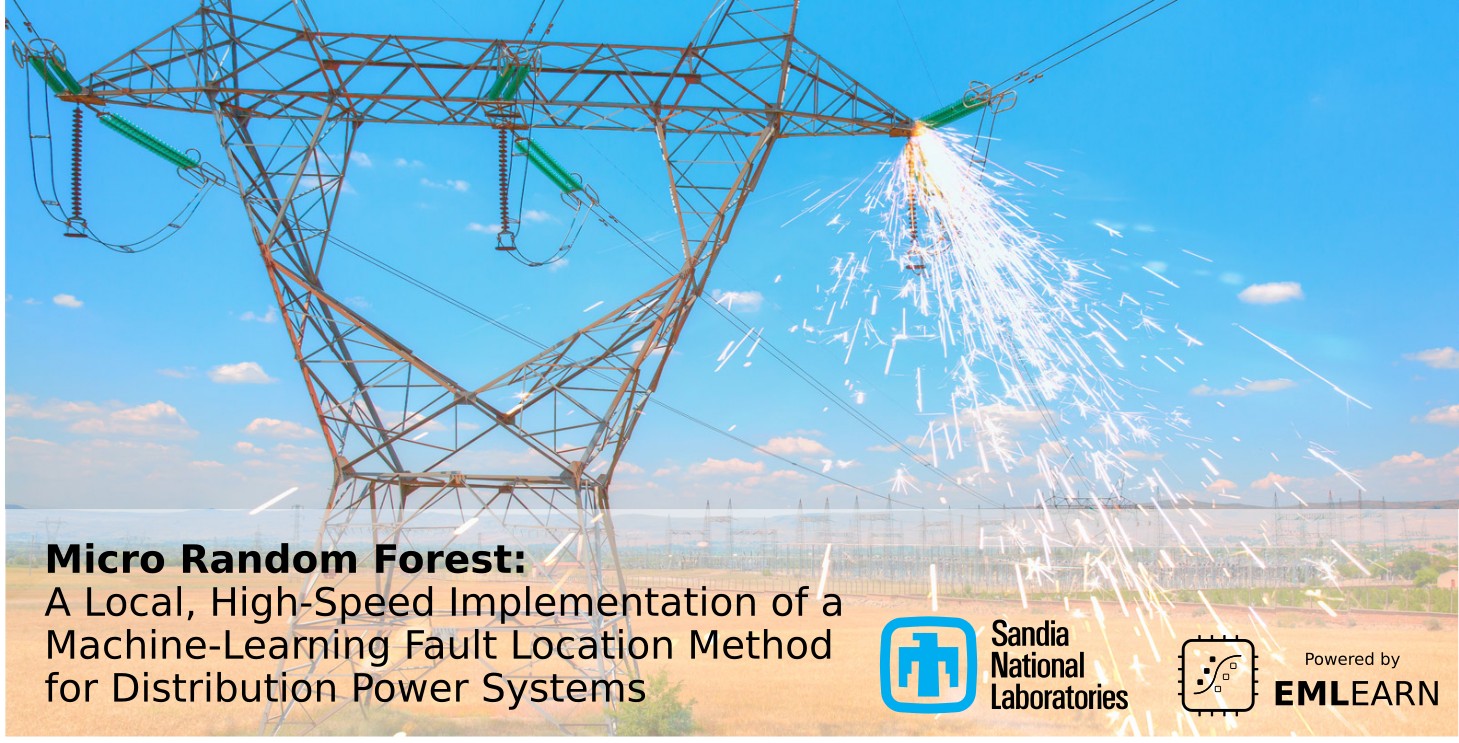
Researchers from Sandia National Laboratories developed a system to identify the origin of faults in the power grid. When an abrupt fault occurs in a power transmission line, this causes a wave that propagates along the line. The wave is influenced by the electrical characteristics of the line as it travels along to other locations in the grid. The researchers used a combination of Digital Signal Progressing and Random Forest classifier to analyzes the signature of an incoming wave, and determines where the fault originated. They tested the system by injecting faults in a simulated model of a grid, and then ported the procedure to a DSP board from Texas Instruments.

Being able to automatically locate failures that occur in grid power lines is key to being able to dispatch maintenance crews to the right place, and could enable quicker recovery times after failures.

Breathing rate estimation in wearables

Paper: Remote Breathing Rate Tracking in Stationary Position Using the Motion and Acoustic Sensors of Earables

Researchers at Samsung used a combination of motion data from the accelerometer and sound data from the microphone on Samsung Galaxy earbuds to estimate breathing rate. First, breathing rate estimation is attempted using the accelerometer. If no estimation can be made, then the audio microphone data is used to estimate breathing rate. This multi-modal approach handles a wide range of cases, which they tested both in a laboratory and home setting. The battery consumption was low enough that the measurements could run continuously.

This kind of technology could be especially useful for people with respiratory diseases, who often need to check their breathing rate to manage and quantify their lung condition.

Activity monitoring for milk cows

Paper: Power Efficient Wireless Sensor Node through Edge Intelligence

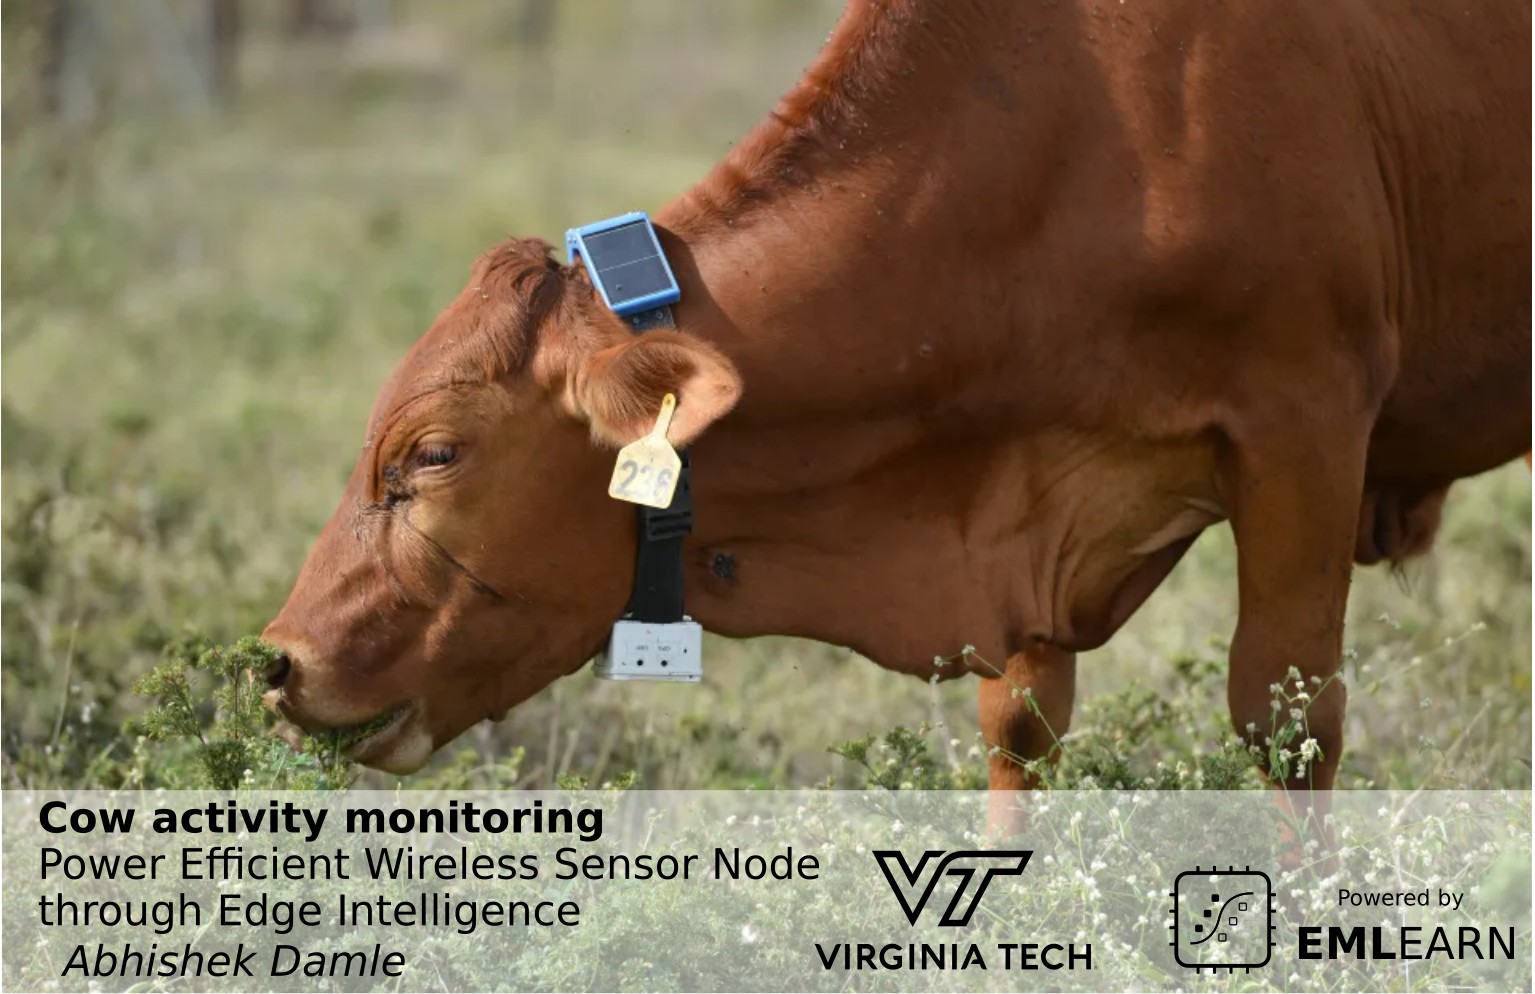
Abhishek Damle, who was a master student at Virginia Tech in 2022, developed a battery-powered sensor that tracks cattle activity. The sensor is mounted on the cow’s halter, and uses a low-power accelerometer to sense motion. A decision tree is used to classify whether the cow is lying/walking/standing/grazing/ruminating. The detected activity is then transmitted LoRaWAN to a central location. They estimate that doing the machine learning on-sensor it consumes under 1 mW, which is 50 times less than if transmitting the raw data.

The activity data can be used to detect abnormal behavior in a cow, which can indicate health issues or other problems.

Recent developments

Classification, regression and anomaly detection

emlearn allows converting scikit-learn and Keras models trained in Python into efficient and portable C code. The first versions of only supported classification. Over the last years, we have also added support for regression and anomaly/outlier detection for a range of models.

Examples of outputs for some of the models supported by emlearn, in different types of ML tasks

Improved documentation

To facilitate further usage, I decided to do a pass to improve the documentation this summer.
Now there is more detailed documentation for Getting Started, that covers setting up and running the first model – be it on your PC, on Arduino, or running in a Web browser. There are also task-oriented pages in the user-guide – covering Classification, Regression, Anomaly Detection, Event Detection (for now).

emlearn documentation now has a User Guide, C API reference, Python API reference and Examples

MicroPython support

Whereas C is the lingua franca for embedded/firmware engineers, Python is the lingua franca for Data Scientists and Machine Learning Engineers.
emlearn itself is written in portable C99, and makes it easy to train in Python (on computer) and deploy to C (on device).
This is practical, but for some users and applications it could be even nicer to do also the device code in Python. This is now made easy with emlearn-micropython.

The MicroPython project is a Python (3.x) implementation designed for microcontrollers. It is around 10 years old by now, and has a good level of maturity. It is a very efficient and compact Python implementation, and runs on 32-bit devices with at least 256k of code space and 16k of RAM.

The emlearn-micropython are released as .mpy modules, which can be added to an existing board by copying it over USB/serial/WiFi. No rebuilding or flashing of the firmware needed! This uses the dynamic native modules feature in MicroPython. This is really quite magical, and lets us realize a workflow which has the convenience of Python, and the efficiency of C.

Example code for host
# Train a model using scikit-learn
estimator = RandomForestClassifier(n_estimators=3, max_depth=3, max_features=2, random_state=1)
estimator.fit(X, y)

# Convert model using emlearn
cmodel = emlearn.convert(estimator, method='inline')

# Save as loadable .csv file
cmodel.save(file='xor_model.csv', name='xor', format='csv')
Example code for device
import emltrees
import array

model = emltrees.new(5, 30) # ensemble of up to 5 trees and 30 decision nodes

# Load a CSV file with the model
with open('xor_model.csv', 'r') as f:
    emltrees.load_model(model, f)

# run inference with the model
examples = [
    array.array('f', [0.0, 0.0]),
    array.array('f', [1.0, 1.0]),
    array.array('f', [0.0, 1.0]),
    array.array('f', [1.0, 0.0]),
]
for ex in examples: 
    result = model.predict(ex)
    print(ex, result)

There are some existing projects that allow to generate (Micro)Python code for ML models, such as m2cgen and everywhereml. But while MicroPython is a pretty efficient Python, a C implementation should still be able to do better. To test this, I ran some quick benchmarks. These were performed on a RP2040, an affordable and popular ARM Cortex M0 chip.

Inference speed comparison of emlearn-micropython compared to other frameworks.
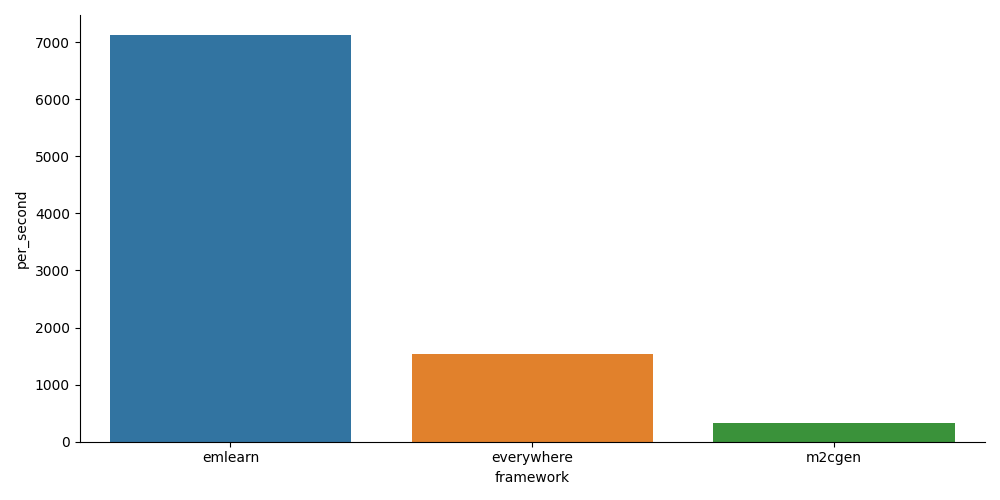
Y axis is the number of samples per second (higher is better).

As expected, the emlearn approach is many times faster than pure-Python based approaches. This could be further increased by enabling fixed-point/integer support in emlearn.

The TinyML wave has only just begun

emlearn is a library for Machine Learning on microcontrollers and embedded systems – often referred to as TinyML. There are over 20 billion microcontrollers shipped every year. From 2022 it is estimated that over 2 billion of these are TinyML devices, up from 15 million in 2019[1].
So it is still very early days for this field. And it will be very interesting to see where emlearn goes in the next 5 years.

MicroFlo 0.2.0, visual Arduino programming

Two months after MicroFlo 0.1.0, another important milestone has been reached. This release brings a basic visual programming environment and initial support for all major desktop platforms (Win/OSX/Linux). The project is still very much experimental, but it is now starting to demonstrate potential advantages over traditional Arduino programming.

Official release notes and announcement here.

The start of something visual

The “Hello World” adopted from Arduino, a program that blinks the built-in LED a couple of times per second. Pressing Play (>) uploads the program to the Arduino using MicroFlo.

The IDE shown is NoFlo UI, a visual programming environment which can also be used to program JavaScript for the browser and Node.js using the NoFlo runtime. This project is developed by Henri Bergius and rest of the NoFlo team. For more details about the NoFlo IDE project, check their latest update and follow their Kickstarter project.

Talk

At Piksel 2013 in Bergen, I also presented MicroFlo for the first time, to an audience of mostly new media and experimental sound artists. The talk goes into detail about the motivations behind the project, from the quite practical to the more philosophical considerations. Not my most coherent talk, but it gives some insight.

Link

Next

For the next milestone, MicroFlo 0.3, several things are already planned. Focus is mostly on practical improvements to the system, but I also hope to complete prototype support for “heterogeneous FBP”: Allowing to program systems consisting of both host computer and microcontroller programs in a unified manner using NoFlo+MicroFlo.

I am also planning a MicroFlo workshop at Bitraf some time in December and to demo the project at Maker Faire Oslo.

In the meantime, you can get started with MicroFlo for Arduino by following this tutorial. Feedback and contributions welcomed!

MicroFlo 0.1.0, and an Arduino powered fridge

Lately I’ve been playing with microcontrollers again; Atmel AVRs with and without Arduino boards. I’ve make a couple of tiny projects myself, helped an artist friend do interactive works and helped to integrated a microcontroller it in an embedded product at work. With Arduino, one does not have to worry about interrupts, registers and custom hardware programmers to get things done using a microcontroller. This has opened the door for many more people that pre-Arduino. But the Arduino language is just a collection of C++ classes and functions, users are still left with telling the microcontroller how to do things; “first do this, then this, then this…”.

I think always having to work on such a a low level limits what people make with Arduino, both in who’s able to use it and what current users are able to achive. So, I created a new experimental project: MicroFlo. It has a couple of goals, the two first being the most important:

People should not need to understand text-based, C style programming to be able to program microcontrollers. But those that do know it should be able to use that knowledge, and be able to mix-and-match it with higher-level paradims within a single program.

It should be possible to verify correctness of a microcontroller program in an automated way, and ideally in a hardware-independent manner.

Inspired by NoFlo, and designed for integration with it, MicroFlo implements Flow-based programming (FBP). In FBP, a program is constructed by connecting a set of independent components. Each component has in-ports and out-ports, and can only communicate with eachother through these. The connections can be defined using programatically, using a declarative text language,  or using a visual editor. 2D/3D artists will recognise this the concept from node compositors like in Blender, sound artists from applications like Reaktor.

Current status: A fridge

I have an old used fridge, by the looks of it made in the GDR some time before I was born. Not long after I got it, the thermostat broke and the cooler would not turn off. Instead of throwing it away and getting a new one, which would be the cool and practical* thing to do, I decided to fix it. Using an Arduino and MicroFlo.
* especially considering that it is several months since it broke…

A fridge is a simple system, something that should be simple for hobbyists to create. So it was a decent first usecase to test the framework on. Principially, such a system looks something like this:


The thermostat decides whether to turn the cooler on or off, and the cooler switch realizes this decision. There are many alternative methods of implemening each of these two components. I used a DS1820 digital thermometer IC to read temperature, and a hacked NEXA remote controlled relay for the switch.
All the logic, including temperature threshold is done in software on an Arduino Uno.

The code below for the cooler switch would have been simpler (a oneliner, left as excersise for the reader) if I instead had used a active high relay directly on the mains (illegal if not a certified electrician). Or alternatively reverse-engineered the 433Mhz protocol used.


MicroFlo code for the fridge, in the .FBP domain specific language (examples/fridge.fbp)
# Thermostat
timer(Timer) OUT -> TRIGGER thermometer(ReadDallasTemperature)
thermometer() OUT -> IN hysteresis(HysteresisLatch)

# On/Off switch
hysteresis() OUT -> IN switch(BreakBeforeMake)
switch() OUT1 -> IN ia(InvertBoolean) OUT -> IN turnOn(DigitalWrite)
switch() OUT2 -> IN ic(InvertBoolean) OUT -> IN turnOff(DigitalWrite)
# Feedback cycle to switch required for syncronizing break-before-make logic
turnOn() OUT -> IN ib(InvertBoolean) OUT -> MONITOR1 switch()
turnOff() OUT -> IN id(InvertBoolean) OUT -> MONITOR2 switch()

# Config
‘5000’ -> INTERVAL timer() # milliseconds
‘2’ -> LOWTHRESHOLD hysteresis() # Celcius
‘5’ -> HIGHTHRESHOLD hysteresis() # Celcius
‘[“0x28”, “0xAF”, “0x1C”, “0xB2”, “0x04”, “0x00”, “0x00”, “0x33”]’ -> ADDRESS thermometer()
board(ArduinoUno) PIN9 -> PIN thermometer()
board() PIN12 -> PIN turnOff()
board() PIN11 -> PIN turnOn()

Is the above solution nicer than using the Arduino IDE and writing in C++? At the moment maybe not significantly so. But it does prove that this kind of high-level dynamic programming model is feasible to implement also on devices with 2kB RAM and 32kB program memory. And it is a starting point for more interesting exploration.

Next steps

I will continue to experiment with using MicroFlo for new projects, to develop more components and test/validate the architecture and programming model. I also need to read through all of the canonical book on FBP by J. Paul Morrison.

Some bigger things that I want to add include:

  • Ability to introspect the graph running on the device, in particular the packets moving between components.
  • Automated testing (of the framework, individual components and application graphs)  using  JavaScript BDD test frameworks like Mocha or Vows.
  • Ability to change graphs at runtime,  and then persist it to EEPROM so it will be loaded on next reset.

And eventually: Allowing to manipulate and monitor running graphs visually, using the NoFlo development environment. See bug #1.

Curious still? Check out the code, and ask on the FBP mailing list if you have any questions!